There are two phillips head screws on the front. You made me curious, so I popped them. It seems a #0 phillips screwdriver is all you will need to get yourself into trouble
-Mike Mac
P.S. Glad to see they are phillips under the heading of open hardware!
Yikes! Yeah - I can certainly see that RPi board replacement is possible, but do I dare at this juncture? I guess I’ll see if I run up against the memory limit first.
Hey, this sounds like a good bit of documentation we should have.
Though agree, it sounds like a good idea to wait and see if this is really a limitation you need to overcome first.
As Mike said, it’s very easy to get in there and we’ve intentionally designed the Mark II to make it easy to hack on, repair, or extend.
The SJ201 daughter audio board connects via the 40 pin connector which also provides power to the Pi. The display and camera both use the standard Raspberry Pi DSI connections.
One thing to note - depending on how old your Raspberry Pi is and where it was sourced, you might need to update the firmware on it first. At the very least, the older firmware didn’t support USB boot, and even some Pi’s that we received this year were running older versions of the firmware.
I dug into mine and had it disassembled to the point the Pi was replaceable in about 15 minutes. All #1 (maybe some #0?) Phillips screws, but the one challenge for me was digging a fixed shaft screwdriver out of my toolbox because my iFixIt one wouldn’t reach a couple of screws.
Getting the screws back into the holes was trickier, but a good magnetic screwdriver or some tweezers should be all you need there.
I didn’t actually replace the Pi, but when I booted my Dinkum drive in a dev kit, I was prompted with pairing again. Not sure if this is some Pantacor/Selene check for a changed hardware ID or just a coincidence. Should be an easy replacement as long as you’re swapping in a Pi 4 with a new enough bootloader to support USB boot (you can always update the bootloader before installation).
Has anyone managed to do this yet? I’m interested in swapping a spare 4gb Pi4 I’ve got into the chassis, but after the first two outer screws I’m not really sure which of the internal ones need to come out and what the best order to do it in is.
I bit the bullet and did the swap, and everything seems to be working afterwards. Here’s how I did it.
Few notes first off:
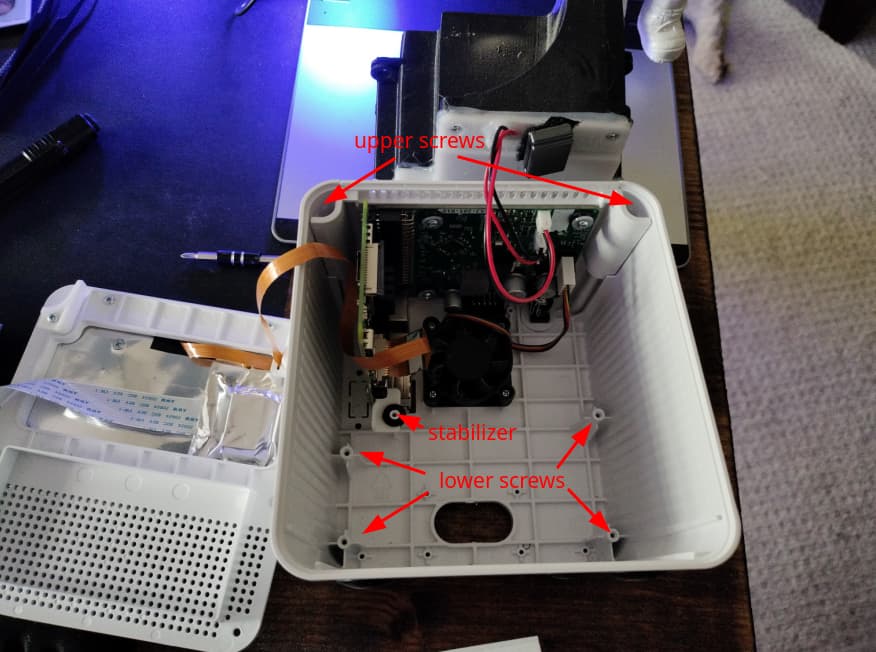
I assumed all seven inner screws were the same size and didn’t keep track, only to discover near the end that one was smaller. I figure it was the one that goes into the stabilizer attached to the Pi since that’s the only odd man out, but you might want to do a better job of keeping track than I did.
Same goes for the little white washers. I had three of them, which I ended up putting on the Pi stabilizer and the two upper screws on the speaker assembly.
It might be possible to do this only removing the top two inner screws plus the stabilizer screw attached to the Pi, and leaving the speakers inside the whole time, but I removed that first before realizing how the top slides out.
You’ll want a long screwdriver plus a well-lit work area and probably a flashlight, some of the screws are tricky to reach and see at the same time.
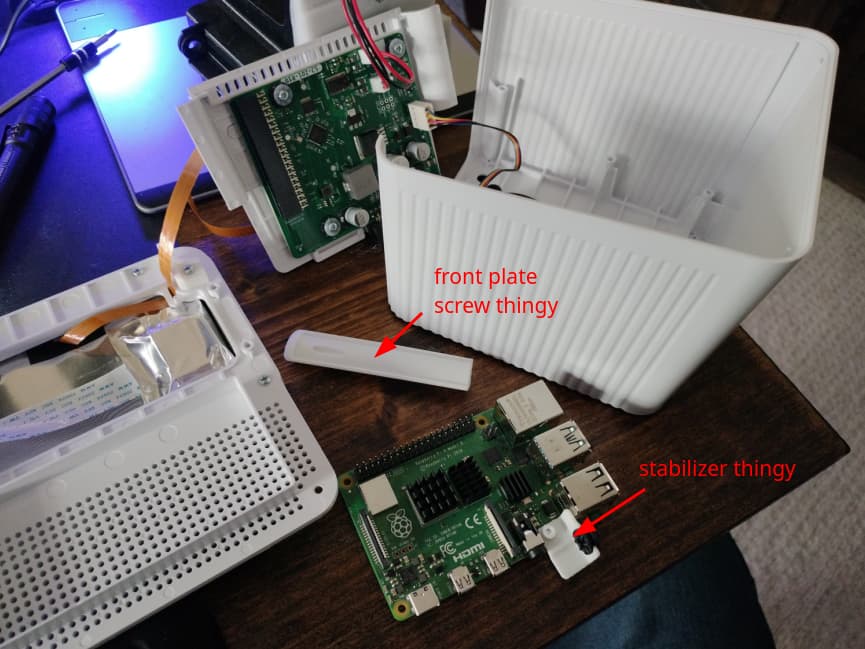
Remove two outer screws, remove front plate with screen, careful of 2 ribbon cables connecting it to the Pi.
Detatch white ribbon cable from Pi.
Remove four lower inner screws, the inserts in the bottom corners that attach the front plate’s screws will come loose and can be removed.
Remove speaker assembly.
Remove the Pi stabilizer screw and two upper corner screws. The upper corner screws are buried deep so you’ll need a long screwdriver or one with an extender attachment like I had.
Slide out top plate with daughter board and Pi attached. I also detached the fan’s cable to make things easier to lay out.
Remove yellow ribbon cable from Pi.
Carefully pry Pi’s GPIO pins out of the daughter board.
Does anyone know where to buy a replacement daughter board? I thought the pi in one of my Mark II’s crapped out so I bought a new pi 4 4gb and put it in and still no fan noise or anything when plugged in.
Awesome, I sent them an email. I bought two Mark II’s and I’m only having trouble with one of them. The one that’s working now did have the usb drive fail but that was an easy fix, other than that it interacts with Home Assistant great so I have no complaints!